You don’t need years of plumbing experience to upgrade your vanity; faucet replacement success actually depends on careful basin preparation before you even touch a wrench. If you’re wondering whether you can tackle this job without flooding your bathroom floor or cracking delicate pipework, your hesitation makes complete sense. Staring at rusted mounting nuts, confusing hole configurations, and cramped supply lines beneath a dark basin can intimidate anyone. The good news is that learning how to replace a bathroom faucet yourself is far more straightforward than you think.
With the right approach, you can master the swap safely and avoid unnecessary plumber call-out fees. In this guide, you’ll learn the essential tools needed for tight vanity spaces, practical tricks to loosen stubborn hardware without scratching your wash basin, and dependable sealant methods for a completely leak-free finish. Read on for your practical, step-by-step path to an elevated bathroom aesthetic you can take pride in every single day.
Key Takeaways
- Shut off your under-basin angle valves completely and keep a basin wrench handy to make working in tight vanity quarters effortless.
- Discover how to replace a bathroom faucet yourself safely by releasing seized mounting hardware without risking cracks to your wash basin.
- Align base gaskets and connect flexible water supply lines correctly to ensure a secure, long-lasting watertight seal.
- Remove the spout aerator before repressurising your plumbing to flush out trapped sediment and safeguard smooth water flow.
Essential Tools and Preparation Before Replacing Your Faucet
Before you unbox a pristine new tapware fitting, setting up your workspace ensures a smooth job. Learning how to replace a bathroom faucet yourself starts with methodical preparation beneath the sink. Skimping on the initial setup often leads to water leaks, rounded nuts, or accidental damage to your vanity countertop. Take ten minutes to assemble your gear and secure your plumbing lines first.
Plumbing Tools and Safety Equipment Checklist
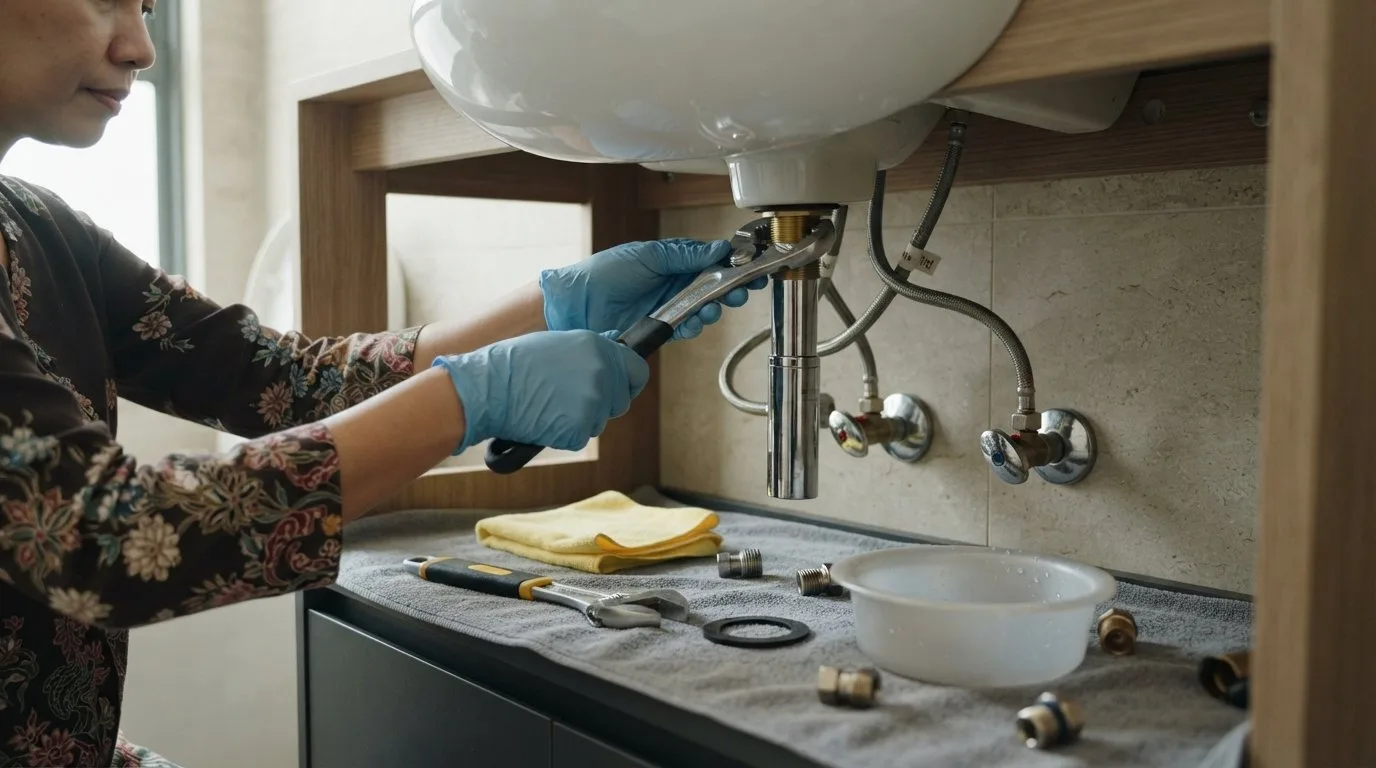
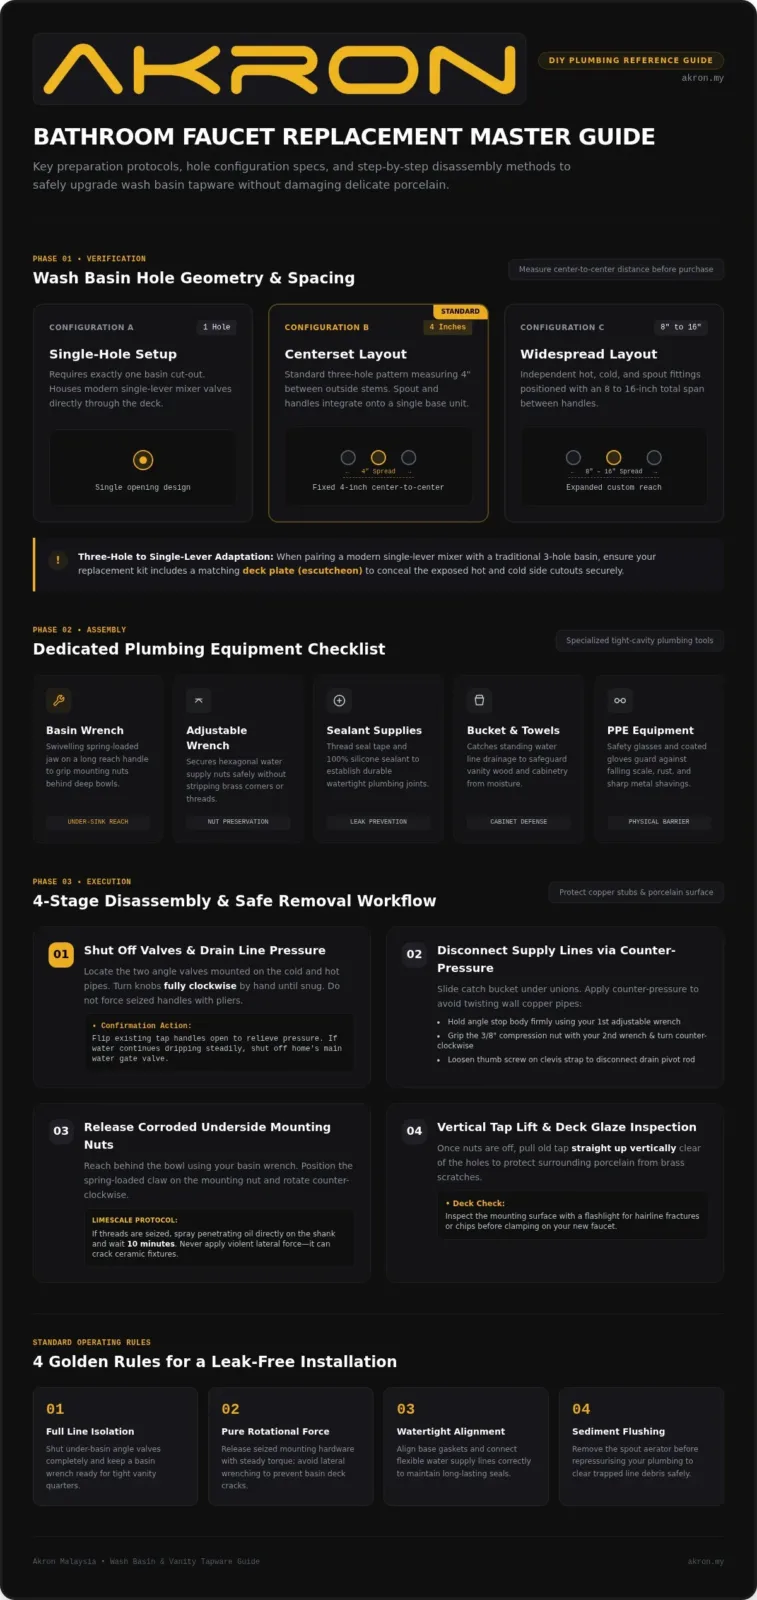
Working in the cramped cavity behind a wash basin requires dedicated gear rather than a random kitchen drawer wrench. Gather these essentials before you begin:
- Basin wrench: Features a swivelling, spring-loaded jaw on a long reach handle to grip narrow mounting nuts tucked behind deep bowls.
- Adjustable wrench: Best for gripping hexagonal water supply nuts without stripping their brass corners.
- Thread seal tape and 100% silicone sealant: Creates watertight joints according to manufacturer instructions.
- Catch bucket and microfibre towels: Captures standing line drainage to protect vanity cabinetry.
- Safety glasses and coated gloves: Protects your eyes from falling mineral scale, dry rust, and sharp thread shavings.
Shutting Off Water Supply and Relieving Line Pressure
An angle valve is an isolated shut-off fixture mounted directly on the cold and hot water inlet pipes beneath your wash basin. Locate these two valves on the wall behind the cabinet. Turn both knobs fully clockwise until they feel snug. Do not force seized metal handles with heavy pliers; turn them smoothly by hand.
Next, flip your existing faucet handles completely open. This step drains standing line pressure and confirms total water isolation. If water keeps dripping steadily from the spout, your angle stops are worn out. You must shut off your home’s main water gate valve before removing any fittings, or turn to experienced residential professionals such as Alberto Pro Plumbing to inspect and replace deteriorating isolation hardware. Slide your bucket directly beneath the plumbing unions before unscrewing anything.
Confirming Wash Basin Hole Compatibility
Mastering how to replace a bathroom faucet yourself requires matching your replacement tap to your basin’s pre-drilled geometry. Grab a tape measure and verify the center-to-center distance between your basin’s mounting holes. Single-hole setups require one opening, standard centerset arrangements measure 4 inches between hot and cold stems, while widespread layouts feature an 8-inch to 16-inch spread.
If you’re pairing a sleek single-lever mixer with a traditional three-hole ceramic basin, make sure your tap kit includes a matching deck plate or escutcheon to conceal the exposed side cutouts. Take a flashlight and inspect the porcelain glaze around the mounting deck. Check carefully for hairline fractures or structural chips that could widen under clamping pressure. For long-term durability, homeowners often pair new fixtures with quality wash basin units designed to resist daily moisture stress and mechanical wear.
How to Remove Your Old Bathroom Faucet Safely
Removing aged tapware is often where DIY projects stall. Threaded components sit under sinks for years, gathering stubborn mineral scale, rust, and grime. Learning how to replace a bathroom faucet yourself means tackling this teardown systematically, protecting your vanity top and existing copper stubs from unnecessary strain.
Disconnecting Flexible Water Supply Lines
Keep your catch bucket centred beneath the shut-off valves before touching any hardware. Uncoupling old lines requires counter-pressure to avoid twisting copper pipes behind the wall:
- Grip the hexagonal body of the angle stop firmly with your first adjustable wrench.
- Clamp your second wrench onto the 3/8-inch compression nut securing the flexible hose.
- Turn the hose nut counter-clockwise while holding the valve steady.
- If your tap uses a pop-up drain lift rod, loosen the thumb screw on the metal clevis strap underneath and disconnect the horizontal pivot rod.
Once loosened, ease the flexible hoses downward into your bucket to drain trapped water completely.
Loosening Corroded Mounting Nuts Beneath the Sink
Reach up behind the basin bowl using your basin wrench. Pivot the tool’s spring-loaded claw so its serrated teeth bite squarely onto the mounting nut. Turn the handle counter-clockwise to break the initial lock. If the threads won’t budge due to limescale, spray penetrating oil directly onto the threaded shank and wait ten minutes.
Never crank the wrench with sudden, violent side-leverage. Applying harsh lateral force against stuck brass nuts transfers high stress directly to ceramic fixtures, which can easily snap or crack the deck around the holes. Steady, direct rotational torque keeps the underside safe.
Lifting the Tap and Cleaning the Basin Deck
Once you spin the mounting nuts off completely, lift the old tap straight up and clear of the holes. Pulling vertically prevents brass shanks or sharp metal threads from scratching surrounding vanity surfaces. If the base feels glued down by old sealants, wiggle it gently from side to side until the seal releases.
Old plumber’s putty and cured silicone leave stubborn, crusty rings behind. Scrape these deposits away using a plastic putty knife rather than a metal blade that could gouge the ceramic finish. Follow up with a rag soaked in isopropyl alcohol to lift residual grease and mineral grit. A clean, perfectly flat surface ensures your new faucet seals tightly against the basin to prevent leaks beneath your counter.
Step-by-Step Guide to Installing Your New Bathroom Faucet
Mounting your fresh tapware transforms the look of your space in minutes. Once the deck is spotless, knowing how to replace a bathroom faucet yourself comes down to proper part sequencing and careful alignment. Take your time with each washer and nut to ensure a solid, worry-free fit.
Seating the Base Gasket and Positioning the Spout
Modern taps typically come with an integrated rubber O-ring or pre-formed base gasket. Seat this seal firmly into the bottom groove of the faucet body or deck plate. You don’t need messy putty if your manufacturer supplies a rubber gasket. Feed the integrated supply lines and threaded shank straight down through the basin holes. Align the spout so it aims directly at the center of the drain. If possible, ask someone to hold the fixture firmly from above so it won’t spin off-centre while you work underneath.
Securing the Mounting Hardware from Underneath
Working below the basin, slide the components up the threaded mounting shank in the correct order:
- Slide the soft rubber washer up first to cushion against the underside of the basin.
- Place the rigid metal friction washer directly against the rubber seal.
- Thread the brass lock nut on and spin it upward until hand-tight against the washer.
Use your basin wrench to snug the nut with an extra quarter-turn. Test the tap from above to confirm it doesn’t budge. Stop tightening as soon as the fixture feels solid; excessive force can fracture vitreous china basins.
Connecting Hot and Cold Water Supply Lines
Most modern fixtures feature flexible braided supply tubes tagged with red for hot water and blue for cold. Route each hose to its matching angle stop valve. Keep the lines hanging in gentle curves without sharp kinks or tight loops. Thread the 3/8-inch compression nuts onto the valves by hand, then finish with a half-turn using an adjustable wrench. Because compression joints rely on an internal rubber gasket or brass ferrule, skip thread tape here so the gasket seats cleanly.
Quality fittings make DIY installation straightforward and protect your vanity from slow drips. Explore Akron bathroom products to choose durable replacement fittings for your space and create a dependable, beautifully refreshed bathroom.
Testing for Leaks and Troubleshooting Common Tap Issues
Your hardware is secured and your water supply lines are connected. Knowing how to replace a bathroom faucet yourself doesn’t end with tightening the last nut; the testing phase is what guarantees long-term reliability. Rushing this step risks pushing loose pipe scale into your fresh internal cartridge or overlooking slow seeps beneath your vanity deck.
Flushing Debris and Testing Initial Water Flow
Never pressurise the system with the aerator attached. Unscrew the small mesh aerator nozzle from the tip of the spout using an aerator key or a soft cloth paired with pliers. Internal plumbing work dislodges dried solder beads, rust particles, and mineral grit from supply pipes. If left in place, this debris clogs the micro-screens and restricts water pressure immediately.
Turn the under-sink angle valves counter-clockwise slowly to restore water flow smoothly. Open both hot and cold tap handles all the way. Let the water run uninterrupted for 60 seconds. This flushes trapped air pockets and loose sediment harmlessly down the drain. Once the stream runs clear and steady, shut the tap off and thread the aerator back onto the spout hand-tight.
Inspecting Connections and Fixing Minor Leaks
Grab a dry piece of toilet paper or a fresh paper towel to run a dependable moisture check:
- Dab around the threaded compression joints at both angle stop valves.
- Wipe along the base where the mounting shank meets the underside of the wash basin.
- Check the connection point of your pop-up drain mechanism while testing its lever to make sure it opens and closes smoothly.
Paper reveals even microscopic seeps that fingertips miss. If you spot a damp ring around a compression fitting, avoid over-cranking the joint. Snug the nut just an eighth of a turn to seat the internal gasket firmly, then re-test with dry paper.
Long-Term Maintenance for Peak Faucet Performance
Preserving smooth water flow requires quick periodic care. Twist off your aerator twice a year and rinse the wire mesh under clean water to remove dissolved mineral deposits. Clean your tap’s polished surface with a soft damp microfibre cloth; harsh chlorine or acidic tile sprays will eat through chrome and electroplated finishes over time.
Selecting reliable fittings built for lasting performance keeps maintenance simple and worry-free. When you’re ready to upgrade fixtures throughout your home, check the Akron contact page to connect with authorised sanitary dealers across the country.
Enjoy Your Refreshed Vanity Space with Confidence
Upgrading your bathroom doesn’t demand complicated plumbing contracts or massive renovation budgets. By understanding how to replace a bathroom faucet yourself, you’ve gained practical skills that protect your home from leaks while giving your wash basin an immediate visual lift. Proper preparation, careful nut alignment, and a quick post-install flush ensure your new hardware performs flawlessly for years to come.
A successful DIY project starts with fixtures engineered for longevity and everyday reliability. Discover a complete range of stylish, high-durability sanitary fittings designed for modern living by exploring tapware options on Akron Malaysia. Backed by a nationwide network of authorised sanitary dealers and direct project support, you can personalize your personal sanctuary with complete peace of mind. Grab your tools, take pride in your craftsmanship, and enjoy your stunning new setup.
Frequently Asked Questions
Can I replace a bathroom faucet myself without prior plumbing experience?
Yes, you can successfully learn how to replace a bathroom faucet yourself with basic tools and careful attention to preparation. Modern tapware assemblies use streamlined mounting shanks and flexible quick-connect lines that simplify the process. As long as you turn off your water isolation valves before starting and follow the washer sequencing outlined in your product manual, you will achieve a secure, professional-quality setup without paying for external plumbing labour. However, if you encounter broader household piping complications and prefer turning to certified local tradespeople, Plumbfix 365 affirms, “We are a trusted plumbing & heating company providing reliable, high-quality services across London and Kent.“
Do I need to apply plumber putty or silicone under a new faucet?
Most modern fittings include an engineered rubber base gasket or foam O-ring that seals the basin deck without messy sealants. If your fixture features this factory gasket, skip the putty entirely, as oils in traditional putty can stain porous natural stone or composite surfaces. However, if your manufacturer specifies added protection or your basin deck has slight surface imperfections, apply a thin, clean bead of neutral-cure 100% silicone sealant beneath the deck plate.
What should I do if the mounting nuts under the sink are rusted stuck?
Soak the locked threads in penetrating spray or rust-dissolving lubricant and let it sit for fifteen minutes to break mineral scale. Next, clamp a basin wrench onto the flat edges of the nut and apply steady rotational force counter-clockwise. Never yank sideways, as sudden lateral force can crack a ceramic basin. If the hardware remains completely seized, use an oscillating multi-tool with a metal-cutting blade to slice carefully through the plastic or brass nut.
Why is my newly installed faucet leaking from the base?
Base leaks almost always happen when the rubber deck gasket slips out of alignment during tightening. If the seal shifts, pooled splash water on the counter slips directly through the mounting holes and drips beneath your vanity. Loosen the mounting nut underneath, reposition the gasket squarely into its groove, and ensure the tap body rests flush against the basin deck. Re-tighten firmly so water cannot bypass the perimeter seal.
Do I need to replace my existing water supply lines when changing faucets?
Swapping out old supply lines for new stainless steel braided hoses is strongly recommended whenever you replace a tap. Over years of water pressure cycles, internal rubber cores degrade, become brittle, and risk bursting unexpectedly. Many modern tap sets come with integrated PEX lines already attached. If yours does not, installing fresh flexible lines ensures clean compression threads and eliminates the hassle of fitting worn rubber washers to your angle valves.
How long does it typically take to replace a bathroom faucet at home?
A straightforward DIY faucet swap generally takes between one and two hours for beginners. If you understand how to replace a bathroom faucet yourself, the physical installation only takes about thirty minutes once the old hardware is clear. Extra time is usually spent clearing vanity cabinet storage, releasing stubborn rusted nuts, and thoroughly wiping aged silicone grime off the wash basin deck before testing for a watertight finish.